Steering gear without power

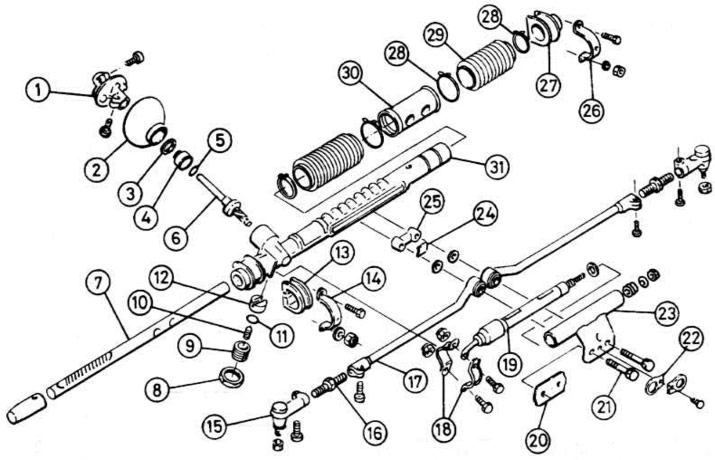
Pic. 10.27. Steering gear with manual control:
I - elastic coupling, 2 - rubber cap, 3 - fixing ring, 4 - gear nut, 5 - sealing ring, 6 - gear with shaft, 7 - gear rack, 8 - lock nut, 9 - adjusting screw, 10 - spring, 11 - sealing ring, 12 - shock absorber slider, 13 - gasket, 14 - clamp (clamp), 15 - end of the tie rod, 16 - adjusting rod stud, 17 - tie rod, 18 - clamp (clamp) steering damper, 19 - steering damper, 20 - intermediate spacer plate, 21 - bolt for fastening the tie rod to the steering mechanism, 22 - fixing plate, 23 - steering damper tube, 24 - guide plate, 25 - slider, 26 - clamp (collar), 27 - rubber gasket, 28 - bellows clamp, 29 - bellows, 30 - tube, 31 - rack housing
Remove the steering gear, as indicated in the previous section, rubber gaskets and clamps.
Remove dirt from external surfaces.
Release the steering bellows clips, then remove the bellow/tube assembly.
Remove the slider and guide plate from the rack.
Remove the lock nut from the rack adjusting screw.
Loosen and remove the adjusting screw and remove the coil spring, seal and damper slider.
Loosen and remove the lower coupling bolt of the flexible coupling, then remove the coupling and rubber boot from the gear.
Remove gear nut and seal.
Remove the rack and pinion.
Remove the sealing cap from the end of the rack housing with a long rod.
Further disassembly is not possible. If the rack bushings or pinion needle bearing are worn, the entire assembly must be replaced. The gear can only be replaced with a bearing.
Wipe off old grease, then apply a layer of grease (company N 1948588 or equivalent) for all moving parts. Inject another 50 grams of grease between the rack bushings and housing.
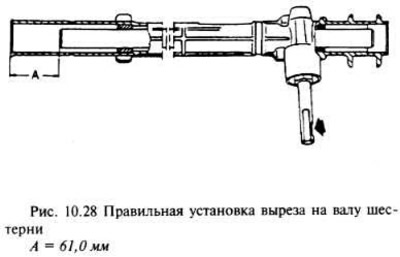
Insert the rack into the housing and position it so that the farthest end of the pinion shaft is positioned as shown in fig. 10.28.

Set the gear like this. so that during a hook with a gear rack, its cutout is located at right angles to the gear rack casing and is directed to the left end of the casing.
Apply a layer of grease to the gear bearing, then screw in the gear nut and tighten it as required.
Install a new gear retaining ring with a piece of metal pipe or bushing.
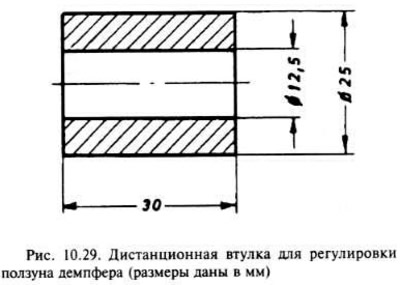
Now you need to adjust the shock absorber slider. Fabricate two spacers according to the dimensions shown in fig. 10.29.

Using the bolts securing the steering gear to the tie rod, secure the slider. guide plate and spacers on the rack.
Install a new damper slider seal, then the slider and coil spring into the hole. Screw in the adjusting screw so that you feel some resistance - the tightening according to the requirements is 5 Nm.
From this position, turn the adjusting screw 20-40°. Check if the toothed rack moves freely all the way.
Without touching the adjusting screw, install the lock nut and tighten as required.
Place a new sealing cap on the end of the rack housing.
Remove the steering gear to tie rod bolts and spacer bushings.
Install the tube/bellow assembly and secure the boot with new clips. Install the clips so that the ends of the clips point upward after the steering gear is installed on the vehicle and check that the bellows are not twisted.
Install the rubber grommets and control gear clips, noting that the left clip is installed with the concave end down with the control gear already installed on the vehicle.
Install the rubber boot and flexible coupling on the pinion and tighten the pinion bolt.
Install the steering mechanism as indicated in the previous section, however, before final tightening the bolts and connecting the tie rod, check the steering wheel alignment as indicated earlier. If the gear position is incorrect (those. the position of the upper bolt of the elastic coupling does not meet the requirements), then the gear should be pulled out and installed as it should be.
After installing the steering gear, make the first maneuvers with the vehicle at low speed, then choose a route with several turns. The control must show a clear self-centering action. If this does not happen, then the rack damper slider must be re-adjusted. The steering mechanism in this case must be removed again.
Power steering
Power steering repair is not recommended.
Fluid leaks and pipe connections can be eliminated by replacing seals.

Visitor comments