Do not allow antifreeze to come into contact with exposed areas of the body and painted surfaces of the car. Wash off accidental splashes with plenty of water without delay. Remember that antifreeze is a highly toxic liquid and getting it into the body, even in small quantities, is fraught with the most serious consequences (up to death). Never leave antifreeze stored in a loosely sealed container and clean up spilled coolant on the floor without delay. Remember that the sweet smell of antifreeze can attract the attention of children and animals. Consult your local authorities for disposal of used coolant. In many regions of the world, special points have been set up to receive various types of detention. Never drain old coolant down the drain and onto the ground!
Recently, non-toxic grades of antifreeze have been developed, but they also require care in handling.
Regularly, in accordance with the schedule of routine maintenance of the car (see chapter Vehicle settings and routine maintenance), the cooling system must be emptied, flushed and filled with a fresh mixture of antifreeze and water. This kind of maintenance helps to prevent the development of corrosion inside the cooling path and significantly increases the efficiency of the system.
During maintenance, the condition of all system hoses and the radiator filler cap must also be checked (see chapter Vehicle settings and routine maintenance). Defective components must be replaced.
Be aware of the precautions that must be observed when servicing the cooling system.
Do not allow antifreeze to come into contact with exposed areas of the body and painted surfaces of the car. Wash off accidental splashes with plenty of water without delay. Remember that antifreeze is a highly toxic liquid and getting it into the body, even in small quantities, is fraught with the most serious consequences (up to death). Never leave antifreeze stored in a loosely sealed container and clean up spilled coolant on the floor without delay. Remember that the sweet smell of antifreeze can attract the attention of children and animals. Consult your local authorities for disposal of used coolant. In many regions of the world, special points have been set up to receive various types of detention. Never drain old coolant down the drain and onto the ground!
Emptying
1. Apply the parking brake and chock the wheels. If necessary, remove the crankcase protection. The direct execution of maintenance procedures should be started only after the engine has completely cooled down, i.e. at least a few hours after the end of the trip.
2. After waiting for the final cooling of the engine, remove the cap from the neck of the expansion tank.
If the engine is not yet completely cool, wrap the cap with a cloth to eliminate the risk of scalding.
3. To drain the coolant from the radiator, disconnect the lower hose from the radiator and drain the liquid through it, then connect the hose to the radiator and tighten the hose clamp.
The coolant should be drained into a drain container of the appropriate volume, which must be prepared in advance. Avoid getting antifreeze in your eyes and on exposed skin.
4. If there are no drain plugs in the cylinder block, complete removal of fluid from the system is not possible and this fact must be taken into account when assembling a fresh mixture.
5. While the liquid is draining from the block, disconnect the hose from the expansion tank and remove the latter. Rinse tank with clean water (if necessary - with soap). Clean the level marks on the sides of the tank.
6. Check the condition of the radiator hoses and hoses of the heating system, as well as the clamps of their fastening on fittings and branch pipes (see chapter Vehicle settings and routine maintenance).
7. Replace damaged components (if necessary, see chapter Engine cooling, interior heating and air conditioning systems).
Flushing
The radiator is flushed separately from the system in order to prevent the risk of blocking the thin internal channels of its heat exchanger as a result of clogging them with deposits washed out from the engine water jacket.
It would also be wise to flush the heater heat exchanger separately.
1. Disconnect the upper hose from the radiator, the upper and lower hoses and insert a garden hose into the nozzle of the first one. Turn on the water supply and continue rinsing until a clean, clear stream comes out of the lower nozzle.
2. In cases of particularly severe contamination or obstruction of the radiator, remove the last (see Section Removal and installation of a radiator of system of cooling) and backflush it by running a garden hose into the bottom outlet - if that doesn't work, take the radiator to a car service shop for the necessary refurbishment.
3. Corrosion products and dense deposits are removed from the cooling system path by chemical treatment - follow the instructions of the manufacturers of the cleaning agent you purchased.
With regular system flushing and coolant replacement procedures, the need for chemical treatment of the tract should not arise.
4. To flush the engine water jacket, remove the thermostat (see Section Removal, installation and check of serviceability of functioning of the thermostat) and disconnect the bottom hose from the radiator.
5. Insert a garden hose into the thermostat hole in the cylinder head, turn on the water supply and continue flushing until a clear stream comes out of the lower hose.
6. After flushing, install thermostat (see Section Removal, installation and check of serviceability of functioning of the thermostat) and restore the original hose connection.
Refueling
1. Check up serviceability of a condition and reliability of fastening of all hoses of a cooling path. Replace defective components, tighten clamps.
2. Move the interior heating control knob to maximum heating.
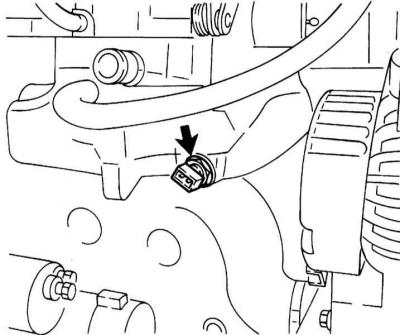
3. On engines OHC 1.2 and 1.4 l disconnect a socket of the gauge switch of temperature and turn out the gauge from the inlet pipeline. Pour the coolant into the reservoir so that its level reaches the lower cut of the temperature sensor hole.
Temperature sensor connector

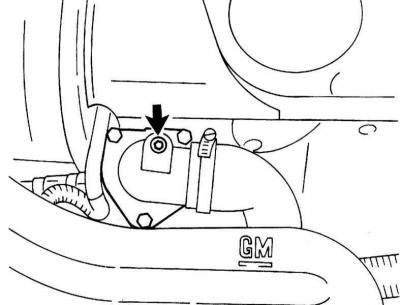
5. On engines DOHC 1.4 and 1.6 l unscrew the hex head screw from the thermostat housing and fill the coolant into the reservoir so that its level reaches the lower cut of the temperature sensor hole. Screw in the hex head screw, lubricating it with sealant (e.g. OPEL 15 03 166), and tighten with force 15 Nm.
Control screw in the thermostat housing

DOHC 1.0 and 1.2 L engines do not have a bleed valve. Air leaves the system on its own when the engine is running.
6. Remove the cap of the expansion tank and start slowly pouring a fresh mixture of antifreeze with water into the neck of the latter. Continue filling until the liquid level in the tank rises to the KALT / COLD mark in the translucent case of the latter. Squeeze the radiator hoses several times to release air pockets.
If the engine has not been completely emptied due to the lack of drain plugs, first pour a couple of liters of distilled water into the system and only then fill in the mixture of the required composition (either antifreeze first, then water again in the required proportions).
7. Reinstall the expansion tank cap.
8. Start the engine and let it warm up to normal operating temperature, then stop and wait until it cools down completely.
9. Inspect the components of the cooling system for signs of leaks, then check the coolant level in the expansion tank, if necessary, make appropriate adjustments.
10. Tighten the expansion tank cap.
11. If equipped, install the crankcase protection.
12. Turn the supply air temperature and fan speed selection knobs to maximum capacity.
13. Start the engine, warm it up to normal operating temperature.
14. In conclusion, make one more control check of the liquid level (see chapter Vehicle settings and routine maintenance).

Visitor comments