Note: Calipers are not subject to refurbishment under the conditions of an ordinary workshop - contact the Opel campaign service station or replace them as an assembly.
Removing
Attention: After removing the brake pads, do not press the brake pedal, otherwise the piston may be squeezed out of the housing. In this case, to install the piston in place, you will have to contact the service station.
1. Remove the brake pads (see Section 5).
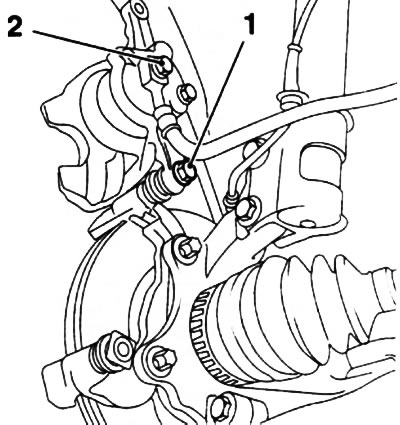
2. Turn out a bolt of fastening of the top directing finger (see resist. illustration) and remove the caliper from the guide.

7.2. Bolt (1) upper guide pin fastenings: 2. Hollow bolt
3. Thoroughly wipe the brake hose connection on the caliper. Unscrew the hollow hose fastening bolt (see illustration 7.2) and remove the copper sealing washers - the washers must be replaced without fail. Seal the open end of the hose and fitting immediately to prevent dirt from entering the system, or attach it to a new caliper.
Note: If the caliper is removed only to remove the brake pads or brake disc, the hose should not be disconnected. In this case, tie the caliper with wire to the body so that the hose is not twisted or stretched.
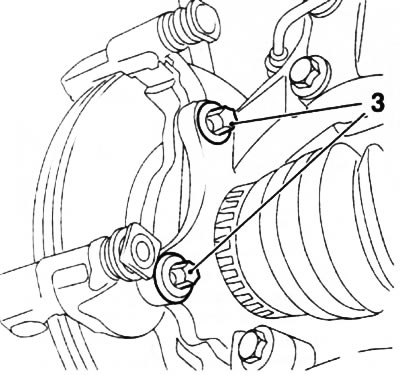
4. Turn out 2 fixing bolts (Togh) and remove the shoe guide from the steering knuckle (see resist. illustrations).

7.4. Togh bolts (3) fastening of the guide of the forward brake mechanism
Attention: A lot of force is required to unscrew/tighten the rail fastening bolts! It is recommended to replace the wheels and lower the vehicle to the ground before performing this operation.
Installation
6. Before installation, clean the threads of all bolts from the remnants of the compound and lubricate it with fresh compound (e.g. Loctite Tour 243).
7. Installation is made in an order, the return to an order of removal. A lot of force is required to tighten the rail mounting bolts (100 Nm!), - check the reliability of fastening the car in the suspended position. It is recommended to replace the wheels and lower the vehicle.
8. If the brake hose was disconnected, do not forget to replace the sealing washers and remove air from the brake path (see Section 3), the hose must not be kinked or kinked.
Note: It is enough to pump only the circuit whose caliper was removed. Check that the hoses on the front wheels do not touch them at the maximum steering angle. Check the fluid level in the GTZ reservoir, correct if necessary (see chapter 1).
9. Before starting the operation of the car, check the proper functioning of the brake system.
Features of Corsa C models equipped with Z17DTH engine and Meriva models
10. On these models, the removal / installation of calipers and front brake guides is carried out in exactly the same way as described above. The difference lies in the appearance and a slightly different design of some parts.

Visitor comments