General information
Note: Incandescent lamps should only be replaced with lamps of the same type. Before replacing a lamp, make sure that the appropriate light fixture is turned off. Do not handle the bulb with bare fingers, use a clean towel or cotton gloves. The dirt left by the fingers on the bulb of the lamp evaporates and is deposited on the reflector. Accidentally left fingerprints should be removed with a cloth soaked in alcohol. It is not allowed to wipe the headlight reflectors covered with a protective varnish with a dry hard cloth, and also to use any cleaners or solvents for this purpose. Use soft wet wipes.
Caution: Halogen bulbs are pressurized and may burst, so wear safety goggles and gloves when replacing them. When replacing xenon lamps, there is a risk of injury due to high voltage! Be sure to turn off the headlights and disconnect the electrical wiring from the battery. After replacement, briefly turn the headlight on and off to remove residual voltage.
Attention: Do not leave the lamp hole open for a long time - dust, moisture or smoke entering the headlight unit can affect the quality of lighting! When installing the cap, make sure that it is fully attached to the surface of the headlight!
1. Models covered in this manual may be fitted with conventional halogen headlamps, ellipsoid (three-dimensional) halogen headlights and xenon headlights.
2. Before starting work on replacing lamps, set the rotary switch for outdoor lighting to the position «ABOUT» (see chapter «Controls and methods of operation», Section 17) and turn off the ignition. Disconnect the wire from the negative battery terminal (see chapter 5).
3. Replacement of lamps is carried out through an impellent compartment. On Corsa models, replacing the right headlight bulbs may require removal of the air duct or air cleaner housing (see chapter 4). To replace the lamps of the left block headlight, you will need to remove the fuse mounting block (see Section 3). Depending on the model, access to the headlight bulbs through the engine compartment can be very difficult, and sometimes impossible - in this case, to replace the bulbs, you must remove the headlight (see Section 13).
4. The general layout of the lamps on the block headlight is shown in Ref. illustrations.
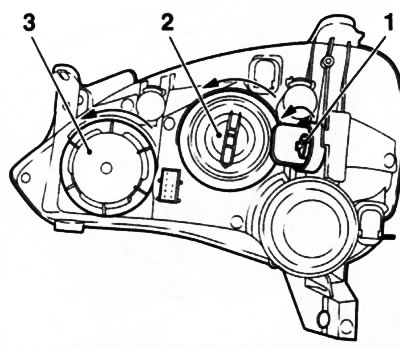
12.4a. The location of the lamps on the headlight of the Corsa models (on the example of the right halogen headlight): 1. Turn signal lamp socket handle; 2. Low beam lamp holder; 3. High beam/ parking light cover | 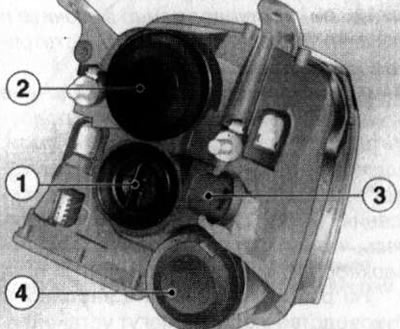
12.4b. The location of the lamps on the headlight of the Meriva models (on the example of the right block headlight): 1. Low beam bulb holder; 2. High beam/parking light cover; 3. Turn signal lamp socket handle with handle; 4. The electric motor of the device for automatically adjusting the direction of the optical axes of the headlights |
5. After replacing the lamps, check the correct operation of the lighting - if the result is unsatisfactory, contact the service station. Headlight adjustment is recommended only at a service station, where there is special equipment for this. Regulator (with appropriate equipment) the direction of the optical axes of the headlights when performing the adjustment must be set to «ABOUT» (see chapter «Controls and methods of operation», Section 17).
High beam
6. Open the hood and perform preliminary operations (see above).
7. On Corsa models, rotate the high beam/parking lamp cover (see illustration 12.4a) counterclockwise and remove it. On Meriva models, an elastic protective cover is installed, pry the edge of the cover and remove it.
8. On a headlight equipped with a mounting bracket, disconnect the electrical wiring connector, press the bracket forward and then to the side (see resist. illustration) and throw it away. Remove the lamp from the socket.
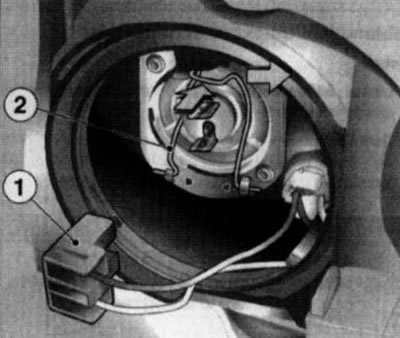
12.8. Disconnect the connector (1) electrical wiring and wring out the mounting bracket (2) in the directions indicated by the arrows
9. On a headlamp not equipped with a bracket, press the lamp wiring connector up (see resist. illustration) and remove the lamp from the seat, then disconnect the wiring connector.
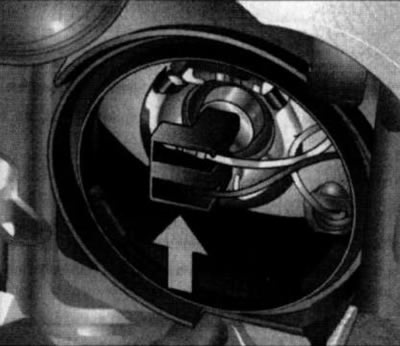
12.9. On a headlamp that is not equipped with a bracket, to remove the lamp, press the electrical wiring connector up (arrow) (Corsa models)
10. Installation is carried out in the reverse order.
Parking lights
11. The parking light is mounted on a reflector next to the high beam (see resist. illustration). To access the bulb, remove the high beam bulb cover (see above).
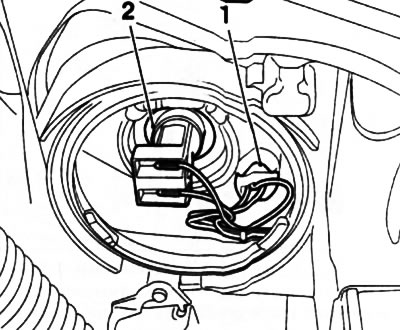
12.11. Cartridge (1) parking light lamps installed next to the lamp (2) high beam (Corsa models)
12. On Corsa models, pull the parking light bulb holder towards you (see illustration 12.11) and remove it from the reflector. Remove the lamp from the socket.
13. On Meriva models, to remove the cartridge from the reflector, squeeze the side latches (see resist. illustration). Remove the lamp from the socket.
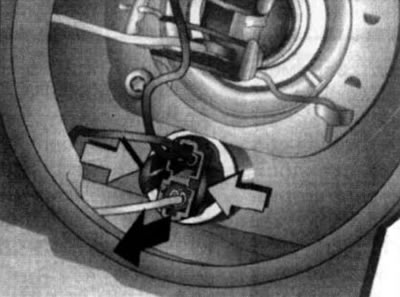
12.13. Squeeze the side latches (light arrows) and pull (dark arrow) socket with reflector parking light lamp (Meriva models)
14. Installation is carried out in the reverse order.
Front direction indicators
15. On Corsa models, in order to remove the front turn signal lamp from the left headlight, in addition to the operations indicated at the beginning of this section, it is necessary to pull out the relay block mounted on the fuse mounting block housing from the holders. To remove the corresponding lamp from the right headlight, you will additionally have to remove the nozzle for filling fluid into the headlight washer reservoir (with appropriate equipment).
16. Turn the turn signal lamp socket by the handle (see illustrations 12.4) counterclockwise and remove from the holder along with the lamp.
17. Slightly press the bulb into the socket, turn it counterclockwise and remove it from the socket.
18. Installation is carried out in the reverse order.
Dipped beam
Conventional halogen headlights
19. Open the hood and perform preliminary operations (see «general information» at the beginning of the section). On Corsa models equipped with headlight washers, remove the reservoir filler pipe.
20. Turn counterclockwise the low beam lamp cover on the back of the headlamp (see illustrations 12.4) and take it off.
21. Pull the lamp socket out of the reflector socket and remove the lamp from the socket.
22. Installation is carried out in the reverse order.
Ellipsoidal halogen headlights
23. Open the hood and perform preliminary operations (see «general information» at the beginning of the section). On Corsa models equipped with headlight washers, remove the reservoir filler pipe.
24. Squeeze out the lock bar (arrow A) and remove the protective cover of the dipped beam lamp from the back of the headlamp (arrow B) (see resist. illustration).
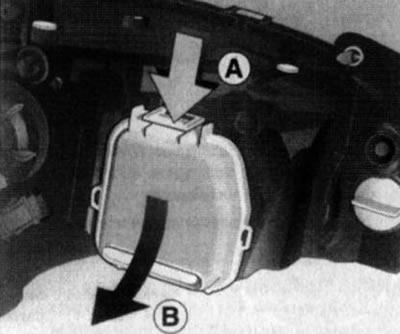
12.24. Removing the protective cover of the dipped beam lamp on the ellipsoid and xenon type headlamp
25. Disconnect the lamp wiring connector, wring out and fold back the mounting bracket (see «high beam») bracket and remove the lamp from the reflector.
26. Installation is carried out in the reverse order.
Xenon type headlights
Attention: High voltage accumulates in the electrical circuit of the xenon headlights! Be careful, follow the recommendations given at the beginning of this Section! It is advisable to entrust the replacement of xenon lamps to service station specialists.
27. To replace the dipped beam foot, you must first remove the headlight from the car (see Section 13).
28. Remove the protective cover of the dipped beam lamp. On Corsa models, the cover is removed in the same way as on the ellipsoidal headlight (see above). On Meriva models, the cover is secured with 3 screws.
29. Turn the ignition block counterclockwise (see resist. illustration), release it from the holder and remove the unit from the lamp.
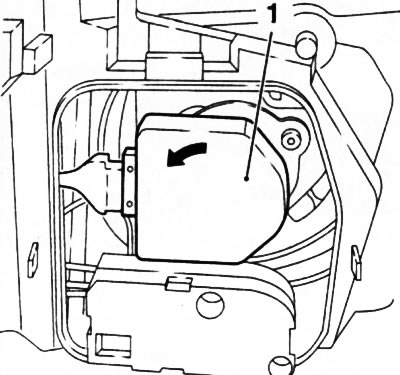
12.29. Turn the block (1) ignition in the direction indicated by the arrow and remove it from the dipped beam lamp (xenon type headlamp)
Attention: Never turn on the headlights with the ignition unit removed!
30. Turn out 3 screws and remove a lock ring (see resist. illustration), - hold the bulb when removing the ring to prevent the bulb from falling out. Remove the xenon lamp from the reflector.
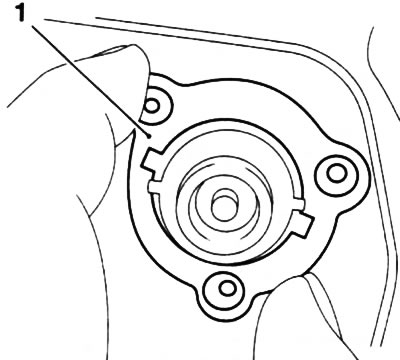
12.30. Retaining ring (1) low beam lamps (xenon type headlamp)
31. Install a new lamp in the reflector socket and secure the retaining ring with screws. Pay attention to the marking of the ring and lamp.
32. Further installation is carried out in the reverse order of removal.

Visitor comments