Removing
1. Park your car on level ground (not slanted) and set the steering wheel to the straight ahead position. Disconnect the negative cable from the battery.
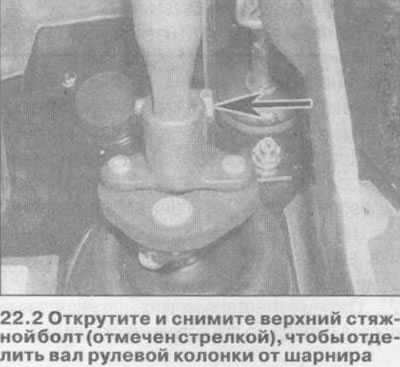
2. Working in the driver's footwell, release the bracket, unscrew the screws and separate the lower trim panel from the dashboard. Mark the steering column shaft and elastic joint with alignment marks, then unscrew and remove the upper joint pinch bolt and separate the end of the shaft from it (see illustration).

3. Remove the steering wheel as described in Chapter 21. On models equipped with a driver's airbag, remove the airbag contact block (see related section).
4. Where available, detach the shaft from the steering column height adjustment lever.
5. Remove screws and take from a steering column the top and lower casings.
6. Remove the steering column lock cylinder (see chapter 23).
7. Remove the contact block of the ignition switch (see chapter 23).
8. Squeeze the latches and remove the combined switches from the steering column (see related section).
9. Working under the steering column (at the bottom of the dashboard), release the mounting bracket and open the access cover to the fuse box and relay box (it is equipped with hangers). Remove the screws, unhook the travel stop and remove the cover from the dashboard.
10. Loosen and remove the mounting screws, then slide the fuse box and relay box out of the panel without disconnecting the wiring harnesses.
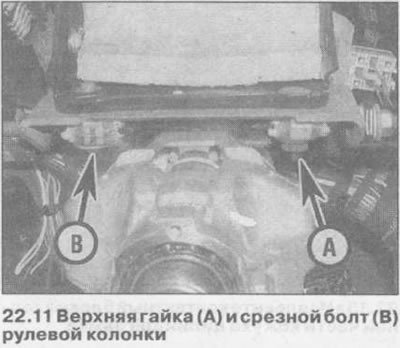
11. From above the steering column is fastened with a nut and a shear bolt (see illustration). To remove the shear bolt, drill a 3.2 mm hole in it, then remove the bolt using a shear bolt remover. Alternatively, drill out the top of the bolt and remove it with pliers.

12. Turn off a nut of the top fastening and separate a shaft of a steering column from an elastic coupling. Handle the speaker carefully so as not to damage its impact-absorbing folding section.
Installation
13. Install in reverse order. Tighten all nuts and bolts with a tightening torque specified specifications. Before tightening the shear bolt, be sure to align the marks made before removal. Tighten the bolt so that its head breaks off. Make sure that when the front wheels are in the straight ahead position, the steering wheel bars are symmetrical. Tighten the tie bolt with a tightening torque specified specifications. Make sure the rubber o-rings of the switches are correctly positioned in the top casing.

Visitor comments