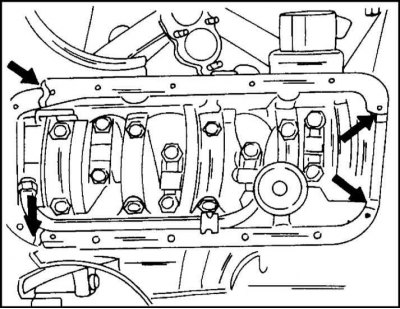
The arrows show the places where sealant is applied to the groove of the rear reference plane.
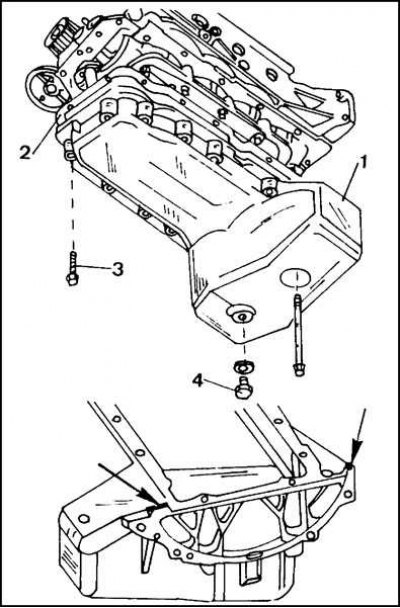
1 - Oil pan; 2 - Gasket; 3 - Bolt, 20 Nm; 4 - Drain plug.
As with older vehicles, the front axle beam must be lowered. The main changes were made in the design of the oil pan. To remove the oil pan, place the front of the vehicle on stands.
1. Remove the bottom protective sheet (sump guard).
2. Place a container under the crankcase and remove the drain plug from the crankcase. Engine oil should be warm, but not hot.
3. Remove the suspension beam located under the oil pan.
4. Lower the front axle as described in the relevant section.
5. Loosen the bolts and disconnect the clutch hydraulic cylinder from the gearbox (see Chapter Clutch).
6. Turn away bolts and disconnect the pallet of a case from the oil pump and the block of cylinders. The sump mounting is shown in fig. higher
The oil pan is installed in the following sequence:
.

1. Thoroughly clean the mating surface of the cylinder block and apply a small amount of sealant to the corners of the block as shown in illustration. Do the same for the oil pump mating surface on the right side of the bearing cap and on the left side of the oil pump. Also apply a bead of sealant to the grooves in the rear oil pan bushings.
2. Install the oil pan (1), as shown in illustration. higher with new gasket (2) on the cylinder block and oil pump and screw in the bolts. Tighten the bolts to 20 Nm.
3. Install the clutch slave cylinder, cross member and sump guard in the reverse order of removal.
Tightening torques, see Specifications.
4. Finally, screw the drain plug into the oil pan and tighten to 45 Nm. Fill the engine with engine oil.
5. Start the engine and check the tightness of the obtained connections.

Visitor comments